From the post that went up today about the camera setup I put on the roof, now let’s talk about what drives it.
The Old Way
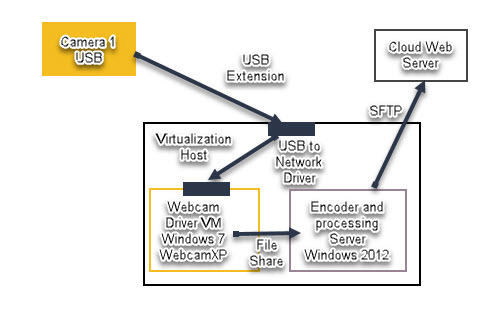
The way I used to do this was very complicated. It required a minimum of 2 VMs on a server, a long and unstable USB cable, a really expensive, and temperamental USB to Network driver, and a lot of (figurative) duct tape to hold the whole thing together.

Because the camera was a desktop grade USB device, it needed special drivers to run it. Those drivers would not run on a server platform. And they could not run more than one camera on a single machine. So I came up with the way to have seperate “Driver VMs” that would handle running the cameras. They were inefficient and and always overloaded due to how bad the drivers were. (MS Lifecam drivers)
I then had them deposit the frames onto a server that would run the scheduled scripts to encode and upload the video. This process broke down most often.
Because I was running all in dos shell and how temperamental ffmpeg is (and how crappy WebcamXp was in writing files), I had to rename every file before it would encode. Every hour the processing server would run a few scripts that would do the following:
- Rename all the files in a sequential and simple order
- FFMpeg would convert the frames to video
- An NcFTP or SFTP session would be sent to upload the completed video to the cloud.
Every step in there was highly resource hungry both in disk IO and CPU. I had 6 cores allocated to the process VM and 2 to the Camera Drivers. And if anything went wrong the entire system (each camera drivers VM and then the processing server) would have to be rebooted in order. The USB to Network drivers sent close to 200Mb/sec between the endpoints per camera as well. Which is FAR more than the cameras needed… but is an example of how inefficient this whole thing was.
So that all sucked, but it worked.
The New Way

When I setup our CCTV/Home Security camera system I wanted it to be streamlined, efficient. I setup my old HTPC (replaced with a Nuc), upgraded the CPU to a IvyBridge Core i5 3475S CPU, and 8GB of DDR3-1600 mem. This is a low power but highly capable Quick Sync enabled CPU.
I offload all the NVR duties to QuickSync, meaning at normal load with 7 cameras being processed the CPU idles at 18%. And the NVR is processing close to 75Mb/sec of video data. At normal use it uses under 45w of power.
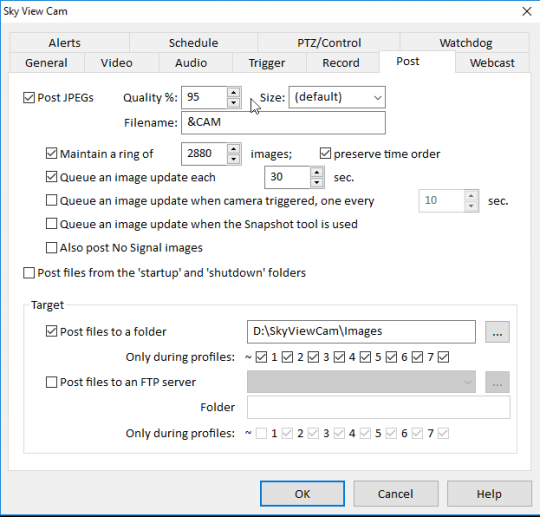
Blue Iris as the NVR (http://blueirissoftware.com/) to handle all the image handling and writing. I set the sky view camera up to post images every 30 seconds:

It writes the files sequentially with file 0 always being the latest:

This is great as it makes a consistent set of files to read from. Only issue is that if you feed these in order of lower to higher, the time-lapse will run backwards.
This is where having a Linux bash shell makes all the difference. You can read a directory backwards with some powershell or dos scripts, but its complex and doesn’t work efficiently. Under a bash shell you can “cat” the directory and feed it into ffmpeg via pipe.
The encoder string I came up with is:
cat $(ls -tr *jpg) | ffmpeg -f image2pipe -framerate 40 -vcodec mjpeg -i - -vcodec libx264 -preset veryfast -vf scale=1024x768 -b:v 2200k -maxrate 3800K -bufsize 3M -profile:v high -level 4.2 -threads 2 -g 250 -y -pix_fmt yuv420p -r 30 /mnt/d/SkyViewCam/Timelapse/skyviewX.mp4
The “
cat $(ls -tr *jpg)
“ reads out the contents of the directory backwards in order and pipes the data to ffmpeg as an mjpeg stream.
FFMpeg is installed into the Ubuntu environment directly, it is not using any binaries installed on the windows side.
Under Windows 10 when you enable the linux subsystem, the shell can access the windows file system “
/mnt/d/
“ is the D: drive as seen in windows.
I limited the encode to 2 threads to keep headroom open for Blue Iris.
I also have the script set to do the ftp upload (using FTP for now as its easy and a completely isolated environment I am hosting just the uploaded file in) With the variables there being populated from a configuration at the start of the script.
ftp -v -p -n $HOST <<End-Of-Session
 user “$USER” “$PASSWD”
 binary
 cd $PATH
 put $FILE
 del $FILE2
 ren $FILE $FILE2
 bye
 End-Of-Session
 exit 0
I have the FTP command upload a new file under a different name, then delete the old file, and then rename the new file to the old one. This avoids having write conflicts while people are viewing the video.
Run the schedule off the windows Task Scheduler:
Under the “Actions” you simply fire up “Bash” and then feed it the linux path for where the script file resides. It’s very simple. I have one for the video encode and one to upload the stills every 5 minutes.

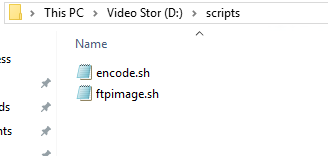
Here is where the scripts are in Windows:

Lessons Learned
A few problems I ran into regarding using bash to run commands on a schedule under Windows 10:

When you run a task using Bash shell under Windows 10, currently in the current build of Windows 10 1709, you are unable to use the “Hidden” Feature… it doesn’t work, the bash shell will open in view every time.
And worse, you cant even fire up the script if you enable “Run whether user is logged on or not” . If you enable that option the scripts simply won’t run. It is a known issue that is supposed to get resolved in the coming builds. It took me 2 days to figure this one out.
The work around for the user login issue is to just have the NVR box auto-login at boot.
The hidden aspect is a pain just because now I see pop-ups of command window every 5 minutes and 30 minutes as events happen. Not a big deal since I am not on the console often, but definitely an issue.
Also… as someone reminded me – Do not write the bash scripts in notepad… they don’t work. I ended up writing mine in VIM.
Hope this helps anyone looking to do something similar!

Keith
“This is where having a Linux bash shell makes all the difference. You can read a directory backwards with some powershell or dos scripts, but its complex and doesn’t work efficiently. Under a bash shell you can “cat” the directory and feed it into ffmpeg via pipe.”
Doesn’t deselecting “preserve time order” accomplish basically the same thing? You can then pass a day’s captures to ffmpeg on Windows w/o the need to invert.