
After 1.5 years of thinking of ideas, and different stages of completion, the printer is 100% done. Tonight I finished the enclosure which was the last part of the project. Over the last couple weeks I designed the hinges, figured out the dimensions, waited on materials, and finally was able to wrap it up tonight. You can see the post that started this all from 2019 here: https://joekelly.co/3d/joes-custom-3d-printer/
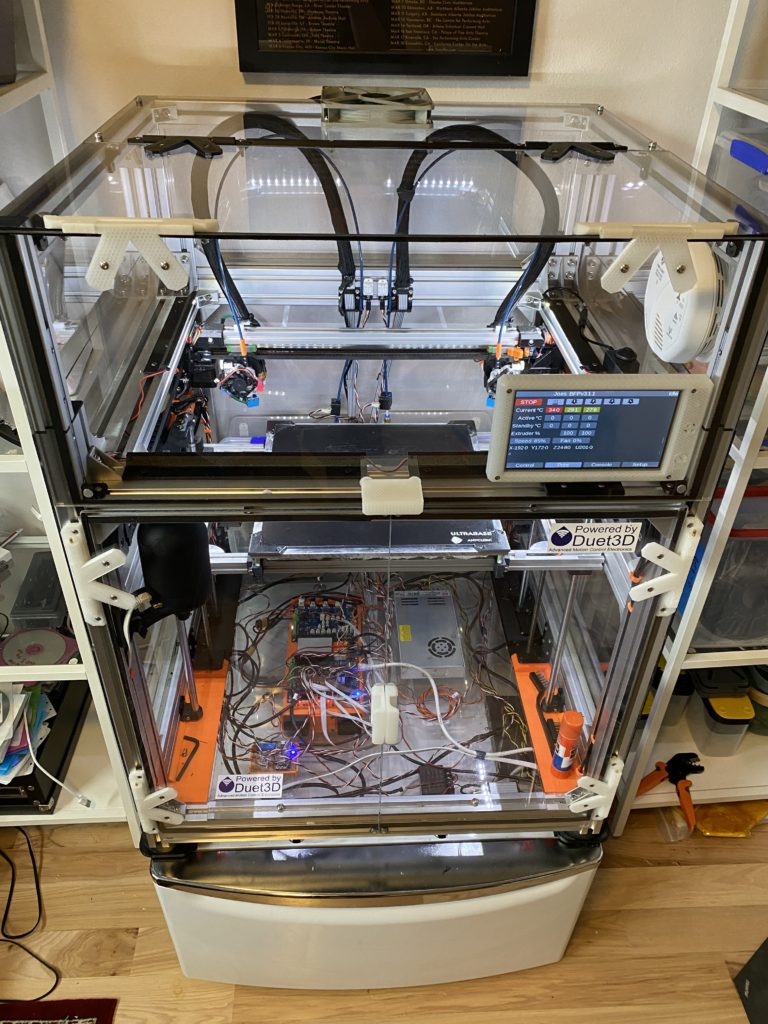
I’ve been calling the printer the JBFP (Joes Big F’n Printer) for the last year and have yet to think of a better name. The run down on the scale of the machine:
- Print Format – Cartesian IDEX (Independent Dual Extruder) with direct drive extruders, and dual Y axis high torque steppers. It can print Standard, Multi-Material, Duplicate, and Mirror print modes.
- Main printer frame is all Misumi 3060 size extrusions (~60# just for the bottom frame)
- Top enclosure frame is light weight Misumi 3030 extrusions.
- 140+ printed parts went into this printer (all except for the PanelDue 7i case are custom designed/modified designs by me.) – not counting wire clips. All designed in FreeCAD
- 6 different printed filaments used for this printer (3DXtech CarbonX, Matterhackers NylonX and NylonG, eSun TPe, PETG(multiple mfgs), eSun ePA-Nylon. With NylonX being the primary for structrual parts.
- Print area is 305x305x315mm (could be expanded to ~400x350x315 with a custom bed size)
- Heated bed is a 700W 120v heated (with its own outlet/power switch) on a 1/4″ thick aluminum tooling plate with a Anycubic Ultrabase glass bed for now.
- Bed Leveling via BlTouch probe
- Print heads are e3D Titan Aero w/ NozzleX nozzles.
- Scripted head cleaning/wipe processes with 2 brass brushes/catch buckets.
- End stops are all contactless Hall magnetic sensors.
- X,Y,U Axis driven by 6x .09*/step high power steppers
- Axis movement speeds are above 250mm/sec at high quality/accuracy.
- Z Axis is integrated 2mm/rotation Acme screw. (1.8*/step)
- Linear rail system is genuine HiWin MGN12 (Long Block, High Precision spec, light preload) for X/U Axis, MGN15 (Long blocks, High precision spec, light preload) for Y axis. Z Axis is on 4x THK 12mm hardened rails/bearings.
- Electronics are Duet2Ethernet + Duex5 add-on board running RepRapFirmware 3.1.1
- Top 140mm fan controlled by a dedicated DHT22 sensor by the Duet2 to regulate enclosure temps.
- PSU is a 24v 360watt compact power supply
- Dedicated ESP8266 based sensor package monitoring printer temps and filament case temps/humidity. Tied into the Hubitat home automation system.
- Dedicated Smoke/CO alarm tied into the Hubitat system to cut the power to the printer if there is smoke.
- $300 in Polycarbonate sheeting on the enclosure (~30# in just that).
- All doors are magnetically held closed.
- It sits on a washing machine pedestal with custom adapted foot stands to take anti-vibration feet.
- Estimating close to 1500 screws went into the building of the printer.
- Total all up weight is close to 100#.
This entire project was a labor of love to get done and besides for fixing things this project is done for now. While it was being worked on its printed hundreds and hundreds of parts for other projects. Think of it like the 2nd Death Star… it wasn’t finished but it was fully operational for close to a year.
What I finished in the last week
Here are some of the things I did to the printer to finish it up in the last week:
Finished the design, and printed the hinge/door parts:
Worked in FreeCAD many nights figuring out proper sizes and designs of the upper enclosure. Figuring out Polycarbonate sheet sizes and thicknesses, designing the hinge structures and really testing the printer in CAD before ordering expensive Polycarbonate. Then printing the hinges in NylonX, NylonG, and ePA Nylon.


Prepped all the plastic sheeting
Took the design dimensions from FreeCAD, and transferred them with a ruler and a pen to all the polycarbonate sheets. I then prepped the sheets and then drilled the proper holes, and then used the 140mm hole template I made for my Rotozip a few weeks ago to cut a single big fan hole in the top. The rotozip template worked awesome! I am going to make some tweaks and then re-size it for 120, and 90mm and post the setup to Thingiverse soon.


Test fitted all the parts
Before securing the sheets to the top of the printer, I had to lay them on, and make sure the tolerances were set right. Then I applied a thin strip of “moleskin” adhesive felt to the joints to give an anti-vibration and anti-draft fit. I also tested the door functionality to ensure it gives me the access to the printer I wanted.

Front portion open 
Fully open 
Felt Tape


Added the magnetic closures / Smoke Alarm
The last step once the top was secure was to design and print some small magnetic closure parts. I designed and 3D printed in NylonX 6 small adjustable tabs that mount on the 3030/3060 extrusion and hold a magnet on the frame side, adn then attached the door side with 3M VHB tape. This has resulted in an incredibly satisfying “thud” when the doors close on the printer. I have a similar setup on the main doors on the front of the printer as well.
The smoke alarm was installed also with VHB near the front of the printer to keep it clear of any moving parts/wire bundles.

Printed magnet mounts 

Magnet for front panel 
Magnets holding the top tight 
Z-Wave compatible Smoke/CO detector


Onto the next phase
- Phase 1 for this project was getting the printer working. That was done around April/May 2019.
- Phase 2 for the project was finishing the enclosure and all the to-do items. That is done May 2020 (today) – This is the completion of this project that started in December 2019 with the idea of building a fully custom printer the way I wanted it.
- Phase 3… will be what ever next new neat technology should be incorporated into the printer. I am already looking at down the road new Extruders (e3d Hemera?, or Zesty Nimble extruder?), I have an idea for non-planar printing once that gets more mainstream (potentially years/decade away though), and upgrading the heated bed/materials to support going onto print higher end materials (PEEK/PEI/PEKK, etc…)
Another curiosity I am thinking about is IDEX tool changer. Having 4 tools that both tool heads can choose from. It makes the complexity of the setup for a tool change way more complicated, but the frame could accommodate it.
None of that is near though… Only “watch” item I have on my list for the printer is ventilation… the 140mm fan may be pulling more air in that n the gaps in the floor I purposely left for this can let in. Nothing a hole saw cant fix.
With that… onto the next project(s)! – First and foremost is the K40 laser cutter and diving into that head first as you can see from the first cut with it this weekend testing it right after getting the optics aligned.